12/29/2010

WHAA Big Battle

Warrior Heroes Armies and Adventures is a ruleset for skirmishes, but it also contains some rules in case you want to play a big battle ala Warhammer Fantasy Battles or Armies of Arcana. So today I decided to try those rules for the first time, and then I gathered all my 10 mm minis and quickly arrayed them for battle. I made four units for each side and deployed them randomly.

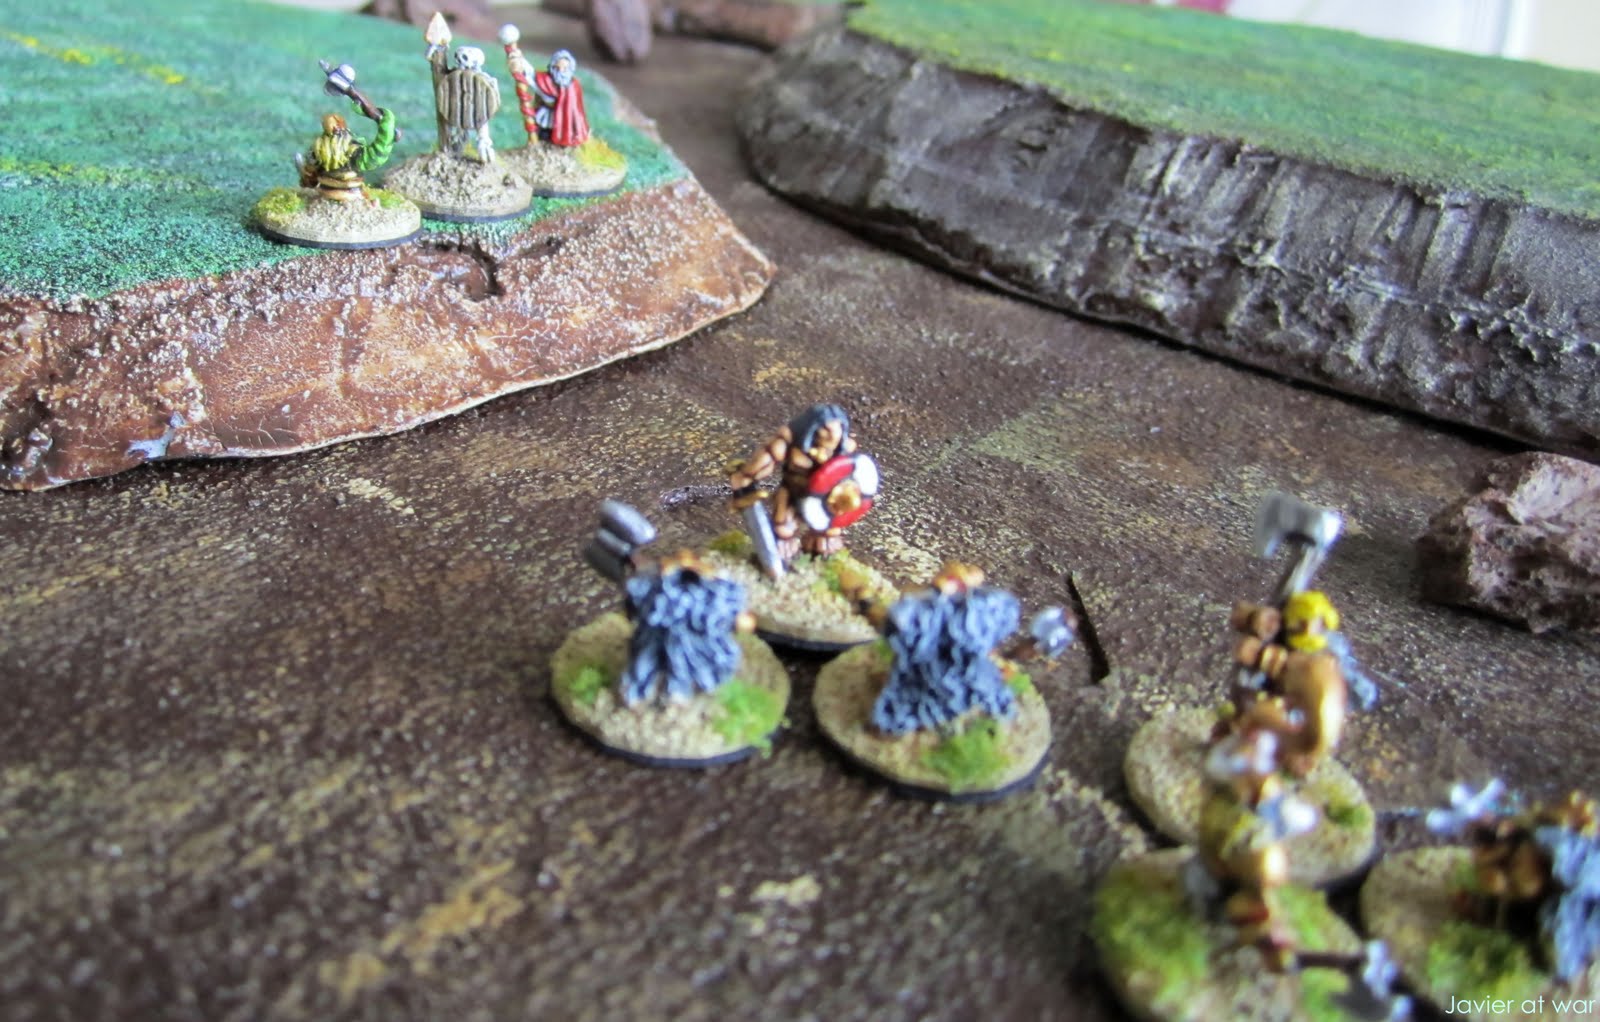
Orc deployment from left to right: one unit of orc warriors Rep 4 AC 2, another unit or Orc warriors with a standard, one unit of Black Orcs with two Trolls in it, and one unit of Orc archers in the wood.
Altengard deployment from left to right: one unit of arquebusiers Rep 4 AC 4, one unit of infantry Rep 4 AC 5, one unit of allied Mirholme warriors Rep 4 AC 5, and finally one unit with four knights Rep 5 AC 6.

The battlefield with the Orcs on the right and men on the left.
On the first turn only Altengard activates and moves forward all its units. On the next turn only the Orcs move and the first unit are the archers who advance and then charge instead of firing as they all are frenzy. The arquebusiers shoot them and one Orc dies and two retreat but the rest charges, killing more than half of the unit in one go, and exterminating it in the following turn.
Then the unit of Black Orcs charges the Altengard infantry, killing most of them as well.
The Mirholmen is the only unit which holds heroically against the Orcs, treating them on equal terms.
The last unit of Orcs tries to charge the knights but in the last moment stops and the charge is failed.
In the last turn the knights are finally charged, being killed two of them and the other two routed. The rest of the Altengard army dies except the warriors from Mirholme, but I finished the battle here as they were outnumbered by four to one and its situation was hopeless.

Four were the main causes of the Altengard's defeat: first they did not have any standards and consequently most of the soldiers routed instead of only retreating. Secondly, excepting the Mirholmen, all the human units were outnumbered. Third, The Humans had bad luck rolling for activation and could only stand and see what was happening, whereas the knight being capable of activating a couple of times due to their Rep, failed all his charges and stood still watching the Orcs coming at them. The fourth reason was that all the Orcs were Frenzy and this give them the extra edge they needed to win all the melees.

WHAA Big Battles works perfectly to simulate WHF style battles; melee is deadly and the game is fast.
I think I am going to use WHAA BB as a bridge between WHAA skirmishes and Rally Round the King for mass battles, for my Campaign of Einar.

12/20/2010

Jackals pursuing wolves. Einar's saga chapter six.

Short time after seizing the sword Soul Reaver, Rialto tells the party they are being followed. Einar gives an order and the party starts to run northwards. After a couple of hours Rialto tells them they are about to be caught and Einar puts a faster rhythm, but Tiku cannot keep up with them.
They are running for their lives, nobody looks at Tiku and she says nothing.

After a couple of hours more, the Dwarfs are closing again and they have to go even faster. This time it is the archer of the group who sit on a rock and watches in silence how the rest disappears in the distance.
Now the party goes faster but the Dwarfs are in their territory and know all possible shortcuts, and after a couple more hours of hot pursuit, they are finally caught and have to stop to fight for their lives.

You use the lower Rep of each group to check how the pursuit goes, and Tiku had Rep 2 and delayed the whole group, so I decided to drop her. Then I start again to check and this time Einar's party had same Rep as Dwarfs (4), so they could escape more easily. But luck was with the Dwarfs and after a couple of rolls I had to drop the archer too, to try to definitely escape, as the next lowest Rep in the group which was 5. Well, even having the Dwarfs worse Rep than Einar's group, they managed to catch them anyway, so now Einar had to fight with only two men against a horde of vengeful Black Moon Dwarfs.

As soon as they could see the Dwarfs, Rialto casts spell "Fear me!" on them which is intervened by a Dwarf caster, who fails and becomes dazzled; half of the Dwarfs are now terrorized.
The Dwarfs charge as fast as they can but none of them reach close combat yet; the arquebusiers miss their shots.

The Dwarf caster resulted to have Rep 4, like his predecessor, so he could badly do anything against Rialto. When he tried to stop Rialto's spell he failed and got dazzled instead, losing one point of Rep to cast, and going the same way during all the encounter until reaching Rep 1.
Ignoring the pathetic efforts of the Dwarf caster to stop him, Rialto successfully summons an skeleton to use it as his bodyguard. Now all the Disciples of Null reach hand to hand combat. Fafnir barely holds but Einar quickly slain one Dwarf and engages the Big Bad, a Rep 5, AC 6, H 3 with a two handed axe. In an epic fight, the Dwarf leader resists many blows by Einar and falls stunned several times until he recovers and hits Einar, but without harming him. The summoned skeleton resists and successfully defends its master from a Dwarf attack.
Rialto summons three wolves in his aid, right on time as the tentacled Dwarf kills his skeleton.
Einar finally kills the Big Bad, and Fafnir runs to help Rialto. But now the rest of the Dwarfs arrive and Einar is charged by four of them. In a very heroic style, he instantly kills two of them and puts in flight the other two!

Einar with Rep 6 and Hardiness 4 and Soul Reaver (produces terror) has become a fearsome and almost unbeatable opponent. It is time for him to search for bigger enemies such as Trolls and Ogres, but we will see this soon as they are heading towards the land of the Orcs. Also, Rialto unbalances all games with his powerful magic so far, so I definitely need to include more powerful opponents in future encounters.
A straggling band of Dwarfs arrives but now Rialto casts "Flee you fools!" and suddenly eleven Dwarfs run away from the battle! Einar and Fafnir quickly dispatches the three remaining Dwarfs and once again they win the day.
The Dwarfs are so terrorized that they will not chase them again, so they can peacefully head towards the Border Kingdoms, through the territories of the Orcs. Einar has kept the Sword and has raised his Social Standing to 9. Also, Fafnir has raised his Rep to 6!

12/15/2010

PORTO en Las Palmas de Gran Canaria.

Porto era una humilde tienda de wargames y librería que abrió por 1.998 y que desde entonces ha sobrevivido a otras tiendas del hobby que abrieron y luego quebraron, principalmente debido a lo bien que se encontraba uno allí y lo mucho que te ayudaban en cualquier tema de pintura, modelismo, conversiones o tácticas de juego, y luego más tarde, por su buena administración.

Porto was a humble hobby shop that has been opened since 1.998 and that has survived many other hobby shops in this small city, firstly because its friendly and helpful atmosphere, and later also because its good management.

La vieja tienda.
Ye olde shoppe.

Hace unos pocos años llegó Adolfo y se hizo cargo de la tienda, y desde entonces no ha parado de crecer cada vez más, hasta el día de hoy, en que ha abierto un nuevo local mucho más grande y moderno. La tienda tiene casi 200 metros cuadrados, 10 mesas de juego, talleres, aire acondicionado, muy buena iluminación y cualquier cosa que puedas necesitar para el hobby.

A few years back Adolfo took charge of the shop and since then it has been growing and growing to the point of opening today a new and much bigger and modern shop. The new local has around 200 square metres, 10 gaming boards, air conditioning and anything you may need for the hobby.

La nueva Porto.
The new Porto

Estoy muy contento porque es una maravilla jugar en este sitio y también porque la tienda va a tener un destacado espacio para jugar históricos como DBA, Impetus, Napoleónicos, Blitzkrieg Commander, Disposable Heroes, Nuts! y Flames of War entre otros. Así que estoy como unas pascuas porque después de más de 25 años de estar jugando en esta ciudad con los de siempre, por fin hay una auténtica tienda donde comprar y donde quedar para jugar y pasarlo bien, ¡e incluso encontrar oponentes para jugar históricos!

Personally, I'm very happy as this new shop is going to devote not only to Games Workshop games but also to historical ones such as DBA, Impetus, Blitzkrieg Commander, Disposable Heroes, Nuts! and Flames of War among others. So yes, I'm very happy, because for the first time after more than 25 years of wargaming in this city, I'm going to have an authentic shop where to find anything I may need for the hobby and where to find opponents to historicals!

Lander terminando los 10 nuevos tableros para DBA. ¡Pronto habrá un torneo!
Lander finishing the ten new boards for DBA. Soon we'll have a tournament!
Si vives fuera y te pasas alguna vez por Las Palmas, no te olvides de visitarnos y echarte unas partidas con nosotros. Si vives aquí, simplemente no puedes perderte esto.

If you live abroad and someday you visit Las Palmas, do not forget to come by and play some games with us. If you live in the island, you simply cannot miss this.

De izquierda a derecha, yo haciendo de reportero y Adolfo, el manager.
From left to right, me visiting the shop and Adolfo the manager.

12/12/2010

In the land of the Dwarfs. Einar's saga chapter five.

After the disaster of Treyine, Einar and his men travel East towards the lands of the Black Dwarf. During winter they cross the north frontiers of Hykar and Mirish, avoiding all possible contact with unwanted patrols until they reach their destine.
It is Spring of 897 and it has passed more than a year since Einar started his quest to find a sword of power to build his own kingdom, but they finally arrived.
The land of the Dwarfs is dominated by great dark mountains and desolated wastes. They start searching for anybody or anything which may help them to find what they are looking for, but they find nothing and keep moving towards the heart of the country. After a month of travelling Eastwards, Rialto's senses warn him that a group is approaching by the road behind them. As they are in unfriendly territory and also they have to "borrow" the sword, Einar decides to set his group in ambush.

As soon as Einar arrived at the Black Dwarf territory, I rolled in the Quest Table to see if he has found the item of his quest. I roll 5 and 1 which meant there was nothing there. Einar's party then move inside the country and again I rolled the dice but this time I got 6 & 6! The object was finally found and I had to go to a Raid encounter. I rolled again and the Raid was to have place at a village; as I did not know how a Dwarf village is nor had any suitable building to represent it, I chose to play the Raid in the wilderness and changed the raid for an ambush.

I'm playing with 10 mm. miniatures in a 60 x 60 cm. board and with all distances halved and rounded up. As usual, all the pictures are clickable.

After being hidden in the rocks for almost two hours, they finally spot a caravan of Dwarfs led by what it look some kind of priest or sorcerer, wearing ceremoniously a long sword sheathed in a barbarously jewelled scabbard, the sword of his quest!
Now, according to the rules my party was of 120 points of CV and this means that I had to fight against 60 Dwarfs approximately, which was absurd; Einar alone worths 40 points of CV so go figure. Therefore, I decided to use the How many of them chart from LOA instead, in which they use a number of figures instead of CV; but as 6 figures was going to be too few to fight against, I used the Hardiness of each character as a number of figures; so Einar's party had a total of 16 "figures".

As soon as Einar sees the sword he jumps on his feet and let the Dwarfs spot him. The Ambush is spoiled.
The Dwarfs came down the road and when they were near the ambushers I rolled to see how the ambush worked. I rolled 5 dice for the Dwarfs and 3 dice for Einar's party (Tiku had dropped her Rep down to 3 in the last encounter). The Dwarfs passed 2d6 more and the ambush went off early and surprise lost. Ambushers were revealed and Activation dice were rolled with the battle going on as normal.

Einar's party activates first but only Rialto and the archer accompanying him. Rialto casts Fear me! and the Dwarf caster tries to intervene. The Dwarf caster tries his best but fails miserably, suffering backlash and remaining dazzled until his next activation.

Rep of Dwarf caster was yet to be determined, so I rolled to see which was and I rolled 3 and 1. The Rep was 4, not very good. He lose by 3d6 more in the test of magic, but saved his life by a hair's breath and only resulted Dazzled. Rialto produced Dread on the first eight Dwarfs with his spell.

Then, the nearest Dwarfs react and charge Einar, Fafnir and Tiku, but two of them stop in the last moment due to the dread Rialto casted upon them. Einar easily parries his opponent and Tiku kills hers outright, forcing the nearest disciple of Null to retreat.
Two Dwarfs at the bottom and armed with harquebuses, fire at the far archer, who covers behind the rocks and returns fire, killing one of them and making two more to retreat.
The Dwarf caster keeps Dazzled, holding the magic sword with his arms and incapable of doing anything else.
The Dwarf caster finally recovers and tries a spell, but is intervened by Rialto and Dazzled again. Now the rest of the Dwarf warriors charge en masse but are rejected once more as Einar and Fafnir kills one warrior each, while Tiku with her two swords holds for the moment. The harquebusier misses.

Fafnir kills another warrior and Einar defeats their leader, the Big Bad, producing some break offs and routs from the battlefield. Then Rialto spells Blinding light and all the remaining Dwarfs get Dazzled; Tiku takes the opportunity to kill her blinded opponent.
The archer fires and hits without further effect.
Rialto casts now Steel Wind and perforates the poor unarmoured Dwarf caster, converting him into pink mist. The remaining Dwarf with harquebus routs and Einar slays the last of the Disciples of Null.
Piece of cake. Mission accomplished, return to base.
Indeed it was an easy encounter, but this was mainly due to the Fear me! spell that Rialto casted in the first turn. More than half of the Dwarfs had dread and failed tests of charge, crisis, leader lost, etc. as well as having worse performance in melee. Then it came Blinding light and the remaining Dwarfs were helpless and doomed. Also, the Big Bad resulted to have only Rep 4 and the Dwarf caster did not have a high Rep neither.

So Einar finally got his magic sword to to become king, according to the prophecy made on his childhood. He passes it to Rialto to check it and he explains to the group that the sword has a name, Soul Reaver. This sword is evil and greedy of souls and carnage; it will help to conquer a throne, but not to rule it. The sword produces terror in the enemies of the wielder; it also adds +1 to impact when used in melee, and +2 against magical creatures and +3 against Daemons. Once a month, the wielder has to roll 2d6 against his Rep; whenever he passes 0d6 he will move one step towards Black Moon worship. So for example, if Einar who is now Twilight alignment, passes 0d6, he will be Rising Moon, and if he fails again then Full Moon. The sword attracts evil.

After designing the sword I proceeded to roll for the Einar's party advancements: Einar raises his Rep to 6 and Social Standing to 8, Fafnir also raises Rep to 5, but Tiku falls to 2 (something must be happening to this wild creature). Rialto raises his Hardiness to 3 and the archer downs his Rep to 3.

After the ambush and looting the corpses, Einar and his friends decide to move directly northwards to the lands of the Orcs as fast as possible to avoid retaliation, and also as the shortest and safest (avoiding the Dark elves) route to the Border Kingdoms where to find their own army, castle and lands.
I will see you all in the next episode of Einar's days of high adventure!

12/06/2010

Elven arrows.

This time I wanted to use a bow based army to see how it worked, and so I borrowed from my buddy some Warmaster High Elves. The Elf army of 396 points was composed of 12 archer units plus two spear units with the general in one of them. All the units are Rep 5 and AC 4, and the archers are also elite. Elves Battle Tactics is C, their War Rating 3, and made Encircle flank deployment (30%-60%-10%).

Their opponent were an Orc and Goblin army of 398 points and composed of 6 Orc Warriors Rep 4, AC 2, 3 Black Moon Orcs Rep 5, AC 4 with the general in one of them, 3 Trolls units Rep 5, AC 4, 10 Goblin archers (foot skirmishers aka meat shield) Rep 3, AC 2, 2 Wolf riders (mounted skirmishers) Rep 3, AC 2, and 1 Boar rider unit Rep 5, AC 2 (shock). Trolls, Black Moon Orcs and Boar Riders produce terror. Orcs and Goblins Battle Tactics is A, their War Rating 3, and made Penetrate Center deployment (20%-60%-20%).

In the first picture it can be seen how the Orcs & Goblins have already moved in their first turn, while the Elves waited for them in the forests. The Orcs had a screen of Goblin skirmishers in front of them and all the cavalry in the right wing.
No heroes nor magicians on neither side on this occasion.
All pictures are clickable as usual.
Second turn and the Elves right wing had already pivoted to face the charging Orcs whereas in the center the Goblin skirmishers suffered two hits each, although they resisted as they were heavily supported (+3).
The Goblin skirmishers accomplished their goal which was to protect the Orcs from enemy fire, and then they stopped and let the Orcs charged the enemy through them. All the Elves resisted the charge and shot before the clash, producing one hit on each of the Orc units, who kept charging and then melee was joined. The Orcs on the left pivoted to face the Elves' right wing whereas the cavalry stopped at charge distance, threatening Elves' left flank.
The archer Elves in the center were outnumbered and routing on both extremes at a rate of two units per turn, and in no time there was only the general with the spears holding the line. On the left flank the Elves rejected the Orc charge, and on the far right the archers finally decided to leave the forest to try to help their general.
The Elves had an extraordinary luck all through the battle, rolling sixes to hit and ones to hold their place, and thus they completely wiped out the Orcs' left wing, held in the center, producing many hits and even pushing back one unit of Trolls and one of Black Moon Orcs. On the right flank, one unit of archers resisted the Boar riders charge and forced them to retire!
But finally the Elves in the center broke and their general died, and as there were only five Elf units remaining on the battlefield, I decided to finish the battle at this point. Most Orc and Goblin units were badly injured nonetheless.

11/28/2010

Green on green.

This was my second game of RRtK and this time I introduced new units like flying creatures, a giant, Magic, a hero and also some skirmishers, to learn more about the game and see how they behave on the battlefield.
Today, some Goblin tribes had gathered led by a powerful Goblin shaman, and had invaded an Orc territory to teach a lesson to their bigger cousins.

From left to right, the Goblin army of nearly 350 points, consisted of one unit of light chariots, one Giant, eight units of Goblins and one of Black Moon Goblins with the general in it, all deployed in two ranks to get full support; then three units of Ogres and finally three units of Goblins Wolf Riders acting as mounted skirmishers.
I commanded and deployed the Goblin army as I wanted to use the Magic rules.
All the pictures are clickable.
All the Orcs of the area had heard of the good news of fun with the Goblins, and quickly assembled an army to fight them off. From left to right, one unit of Wild Boar heavy cavalry (shock), three units of Trolls, six units of Orc warriors plus one of Black Moon Orcs with the general in it, and on the hill one Wyvern and two catapults.
The "machine" play the Orcs and I rolled Encircled Flank deployment: "Attempt to slowly push through the center as one wing made up of the fastest units attempts to turn one flank of the enemy. The other flank is defensive and tries to prevent the center from being encircled. (60% in the center -up to 10% in reserve-, 30% on the right and 10% on the left flank).
Goblins were the attacker and moved first. Moving from their right to their left, the chariots moved right to outflank, the Giant and all the Goblins and Ogres moved straight ahead in one solid block, whereas the three units of mounted skirmish race forward (they move 16"!) to engage the enemy at shooting range. When the mounted skirmishers reached enemy's threat distance, they were charged by the Wild Boars and all the Trolls, resulting in one unit of Wolf Riders routing and two retreating, leaving the Goblins' left flank unguarded!
The Orcs cheered and laughed at the sight of the routing goblins, and advanced their center line, whereas the Wyvern took off and charged the Goblin chariots. The poor sods were so terrified at the sight of the incoming monster that retreated at full speed. Now, Goblins right flank was also threatened. Yay!
In the next turn, the Giant faced right to challenge the Wyvern, and the Goblin's main body pivoted left to meet the Orc warriors who counter charged with two units of warriors. The Goblins revealed their great shaman and the Orcs their hero as well.
OK, it was going to be my first try with magic, so I decided to go for an easy spell and concentrate in a few units, to minimize risk and failure. The Gobbos had a Level two magician accompanied by one of level one, and they tried a difficult one spell (the easiest) on only two units. Thus, they casted Steel Wind and failed horribly, and all users were now at risk. Guess what, both casters failed again and disappeared in a puff of smoke. Sixty army points vaporised in an instant!
The Orcs laughed even louder and finally charged "en masse", crushing the Goblin line and killing many Gobbos, only resisting the tough Ogres. The catapults now in range, together with the Orc Hero, produced terror among the enemy ranks.
The Wyvern ignored the Giant and flew after the fleeing chariots who routed the battlefield. On the right flank the Orc Boar riders charged the two remaining Goblin Wolf riders who also routed.
The Goblins were doomed. Their General surrounded and barely resisting.
The Trolls and the Orc hero kept pushing and the Orc Warriors pivoted right and close the trap. The Goblin general was slay and the few surviving Goblin units routed. The Wyvern tried to charge the Giant by his back but failed the charge test. Also, the Boar Riders finally arrived from their far pursue of the mounted skirmishers, and hit on the Ogres' back, routing them. The Goblin cause was lost and the Orcs had a great time. Game over.
What can I say? I was miserably defeated by the machine. Well, for a start the promising Magic failed me from the very first turn, and also the Giant did not enter in combat. All Goblin cavalry deserted at the early stages of the battle as well.
I think my main mistake was that I am ill playing DBA style, and RRtK is something totally different. Here it is very important to act having in mind the unit's reactions, specially with the Enemy Threat Reaction. Deployment also is something decisive.
Regarding the Orcs, they had two units which were key to their victory. On one hand the Wyvern, a flying unit producing terror and capable to move all around the table and charge from any direction; and secondly and most important, their hero.
Heroes are too powerful and almost impossible to kill that they outbalance any battle. I think they should only be used in campaigns but not on single scenarios.

11/22/2010

Rome against the Green Horde.

As this was my first game with Rally Round the King, I did not pick any heroes, magicians, monsters, flying units nor skirmishers. I just picked my DBA EIR army that cost 302 points in RRtK, and an equivalent points force of Orcs; eleven units of Orc warriors and a Black Moon Orc unit with the general in it. I neither wanted to bog down with new terrain rules so I deployed the armies in a clear plain with a solitaire wood on one side.

The EIR army consists of one unit of cav (shock cavalry according to RRtK), four units of auxilia, five of legionaries (having one of them the general), one ballistae and one of archers. Legionaries Rep 4 and auxilia Rep 3 are elite and have throwing pila and javelins which give them a +2 in the first round of melee. They also have AC 4 (armour class), which proved to be decisive in the battle.
The Orc army consist of eleven units of warriors with AC 2 and one unit of Black Moon Orcs Rep 5 and with AC 4 with the Chieftain in it. All of them frenzy and undisciplined.
Both armies have Battle Tactics class A which consists of armies heavily dependant on melee troops which try to close ground as fast as possible. I commanded the Roman army whereas the Orcs were manned by the "machine". I rolled for their deployment and tactics and they got Penetrate Center: Heaviest melee units are placed in the center with a light screen of skirmish types in front, while the wings hold back to prevents being encircled. Objective it to push through the enemy center. 60% of units in the center with up to 10% in reserve, 20% on the left and another 20% of units on the right flank.
Both armies deployed up to the maximum distance allowed from their baselines, 12 inches. The table is 4'x3', so the armies started approximately at 12" of distance between them.
Romans moved first at their maximum speed (6"), with the cavalry going right to later outflank, and two units of auxilia and the archers heading for the forest. The artillery fired and inflicted one hit on one Orc unit at very long range.
Then it was the Orcs turn and they also moved 6" forward, and being at 1" from the enemy the were dragged into melee. I did not expect them to be upon my Romans so soon!
Being all the Orcs frenzy, they easily passed all their Wanting to charge tests, and all the Roman held except one auxilia that which gave ground and took one hit. The Orcs could not hurt the Romans with their heavy armour and the only wounded were two auxilia that gave ground. On the other hand, the hitting power of the Romans added to the poor armour of the Orcs, inflicted a lot of hits on them.
In the next turn the ballistae routed two Orc units next to the wood, and the equites charged on the right flank routing another one. Meanwhile the legionaries in the center were pressing the Orcs, exchanging some hits and losing one legionary unit in the process.
The Black Moon Orcs, commanded by their leader and supported around by many boyz, proved to be a tough nut to crack, but in the end they routed when the Black Moon Orcs had six hits!
One unit of Orc warriors charged to the equites flank and rout them. Game over.
The Romans lose one unit of legionaries and one unit of cavalry whereas the Orcs lose eight warrior units and the unit of Black Orcs. victory points: Romans 456, Orcs 146.

I have to play some more games to have a better opinion but right now I can tell RRtK is an excellent ruleset to play solo, and possibly head to head. The campaign rules also looks promising. RRtK plays differently to DBA or HotT, and have similar results in different ways, so you must use different tactics.
Something that maybe some people do not like is that troops not always do what you order to them, and you have to live with that. Perhaps it is more luck dependant than other systems but that also adds uncertainty to the game, which is not bad.

11/21/2010

Mech Breakthrough.

My gaming buddy and I decided to pass the Sunday evening playing a battle of mechs with the rules of Mekatac. We set the game at 400 tons per side and randomly decided to play the scenario Breakthrough. He played defender and I had to exit the board behind his line. I won victory points per tons of mechs exiting the board and he per tons destroyed. We used his Advanced Squad Leader de luxe boards as the MWDA bases fit perfectly in their hexagons.
My forces started at the right with a 90 tons Fire Starter as the most heavy mech, and then a Black Hawk, one Mining, one Forestry and one Agromech and one Arbalest. My friend chose similar mechs although more faster and also being one of them a scary 100 tons Mad Cat with twin Plasma Cannons and SML.
All pictures are clickable.
In the two first turns both sides rushed towards the center of the battlefield, forming two close firefights and fierce melees on each flank, while on center my Arbalest run through, crossing with the Mad Cat which ignored it and headed for the last of my mechs.
My Mining mech fired first its three XLML and Rail Cannon with a total damage capacity of 12d10+3d6! I could have destroyed that devil cat but I missed all my shots except one. Then he returned fire and melted my mech with his Plasma Cannons. Ouch!
On the right flank my Black Hawk and Forester met three enemy mechs, one Wasp, One Hollander and one Arbalest. There I managed to destroy the enemy Arbalest and some weaponry of the Wasp, but in return my 80 tons Black Hawk resulted deadly wounded.
He tried desperately to run and exit the board with its jump jets, but burning from flamethrowers and hot pursued by the Wasp, the Hollander and the Mad Cat, he collapsed under a rain of plasma and missiles at two hexes from the sideboard.
On the left flank my Fire Starter failed with its Heavy flamer and Rail Cannon and pushed through enemy mechs, leaving behind its Lance mate, the Agromech which toppled down and got straggled.
Although badly mauled, the Fire Starter managed to escape from his pursuers, but not so the already depleted Agromech on the left, and the heavily outnumbered Forester mech on the right, which tried to escape using covering terrain as much as possible, but was blown away at point blank by the Mad Cat in the last moment.
In the end I escaped with two mechs for a total of 150 tons and my buddy destroyed four for a total of 250 tons. Decisive victory for him and lots of fun for both.

11/04/2010

Meka Tac GSR Patrol

I recently discovered a free ruleset to play with giant robots or mechs called Meka Tac and written by Lloyd Krassner. I read and translated it into Spanish to play with my mates but then I discovered GIANT STOMPY ROBOTS , a Meka fansite with lots of optional rules, and a revised edition of Meka Tac, with many changes and improvements in it. I liked so much what I read that run to print the game cards and grabbed some forgotten plastic mechs and readied this game. As I was playing solo I borrowed some rules from Two Hour Games like the PEF (Possible Enemy Force) system, and here is the result.
All pics are clickable.


A 240 tons Nova Clan Mech Lance is commanded to patrol the bottom of a canyon where a possible enemy infiltration is expected. The Lance consists of one 60 tons Nova Cat Mech piloted by the commander Janis, one 70 tons Crimson Hawk, one tons 80 Black Hawk and one 30 tons Koshi small scout. They can read multiple signals on their screens (3 PEFs markers) and move forward to check them.
Both two first possible enemies resulted to be a false alarm, so the whole Lance headed for the third marker behind the top of a big hill. The first to pass the crest of the hill is the Crimson Hawk and it runs into an enemy Mech, a Skorpion mech assault class which shoots in opportunity, exchanging some damage with the Crimson Hawk, which after that, reverses and gets some cover behind the crest. The Koshi and the Black Hawk get close and poorly fire against the Skorpion. Now the Skorpion moves to close combat with the Crimson Hawk, firing all its armament and making a total of 23 damage points! Janis is too far to help. The Skorpion attacks first again and made 19 damage points against the mauled Crimson Hawk, but now the Black Hawk charges it on its flank and smashes the pilot cockpit(critical hit), killing him instantly and leaving the mech unmanned. The Koshi keeps moving forward and spots a hidden enemy scout mech class, a Frog (a Koshi variant), shooting against it. The Frog ignores the Koshi and runs passing and firing to the Crimson Hawk, adding some more damage to its already debilitated structure. Suddenly, some reinforcements appear, a PEF which splits in two, one of them being a Wasp and the other still unknown. The Wasp flies straight ahead and fires all its weapons against the Crimson Hawk but fails. Now the Frog shoots at Janis and then jumps over her, but she turns around and shoots it down with its two Laser Cannons and SML salvo! Two enemy mechs down. Now the Black Hawk closes to the Wasp and releases all its weaponry, making two critical hits that ruins its computers and produces a reactor core. In the next turn and before the Wasp's reactor explodes like a bomb, Janis goes up the hill, shoots at it and wrecks it. Chalk up another one! In the meantime the Koshi discovers the last enemy mech, a 40 tons Hunchback armed with one plasma projector, one small flamethrower and one small mortar. The Hunchback closes to the Koshi hoping to kill it in one go but misses the plasma and mortar. The Black Hawk come in help, producing a lot of damage and one critical hit that destroys the mortar. The Hunchback tries it again and this time kills the little Koshi, but then it is quickly dispatched by its big brothers. The Nova Cat Clan has lost one 30 tons mech but salvaged an almost new 80 tons Skorpion and win the day. The game was great fun and fast, and the rules gave me the feeling of commanding giant robots into battle. Soon I will be playing another game!