This blog is to share my main hobby which is painting and wargaming with miniatures. I paint and play historics, fantasy and sci-fi, from 6 mm to 28 mm.
Showing posts with label Warrior Heroes Armies and Adventurers. Show all posts
Showing posts with label Warrior Heroes Armies and Adventurers. Show all posts
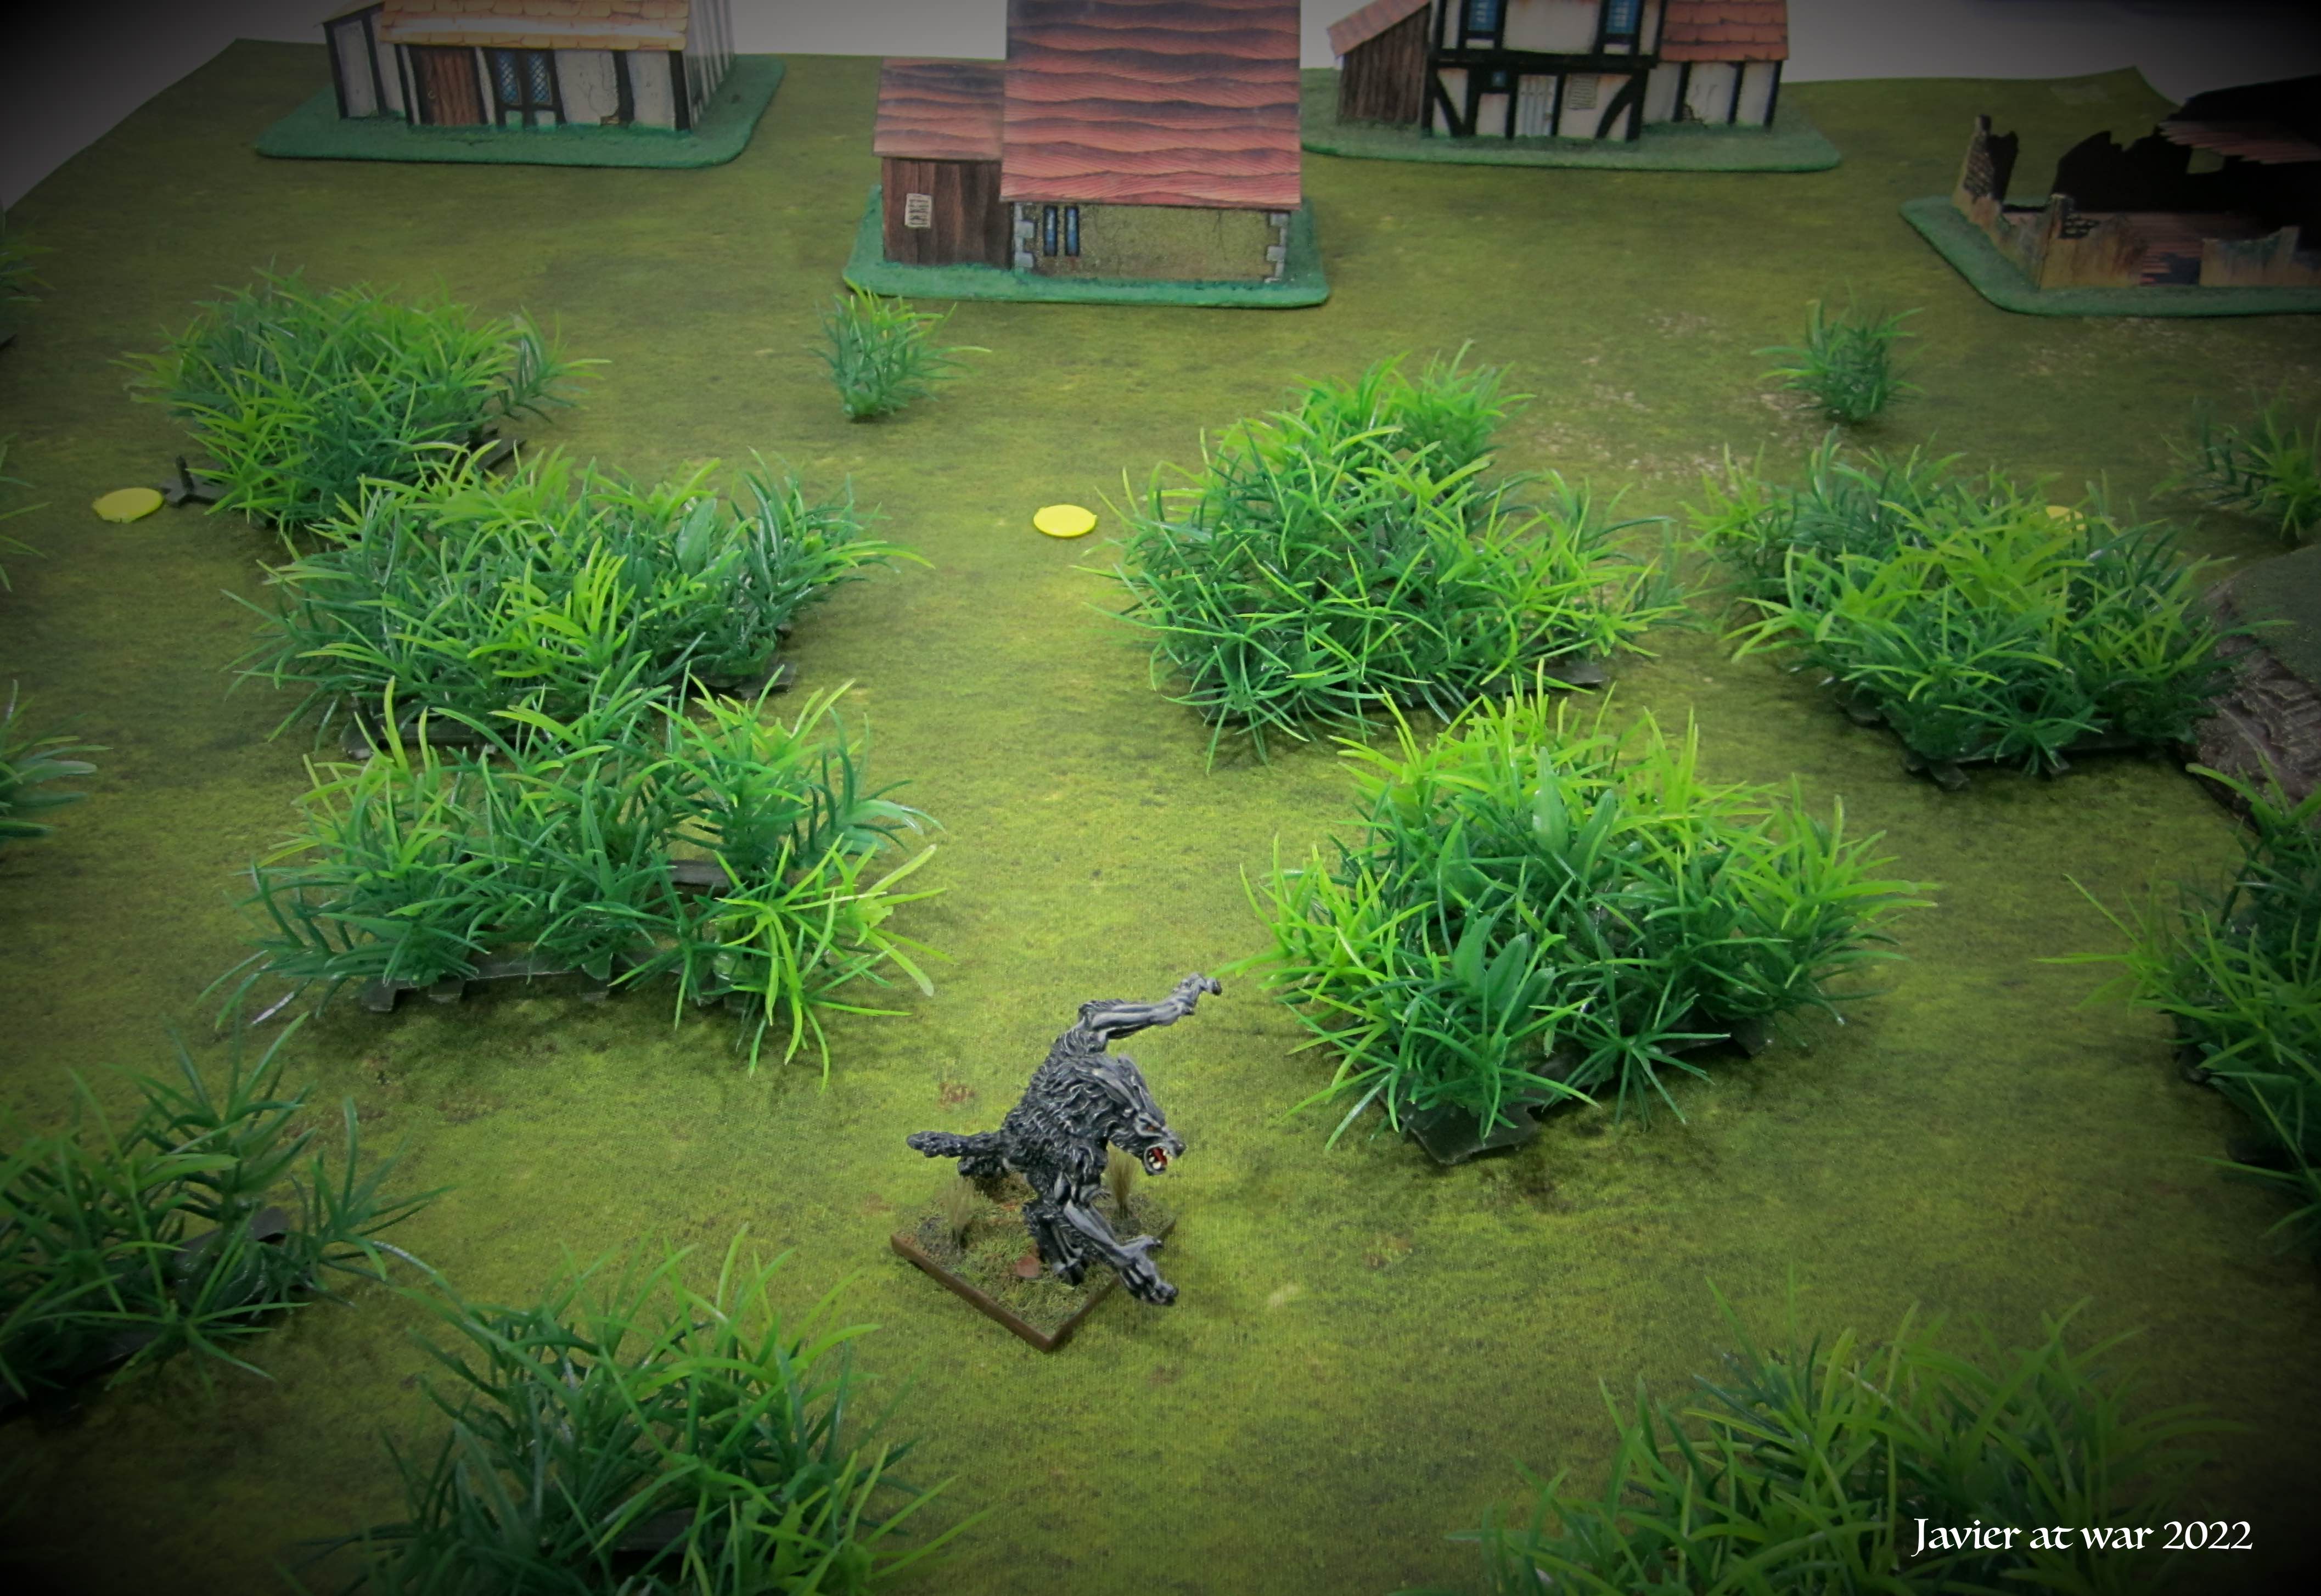
I am testing one of the scenarios for the new adventure supplement for Warrior Heroes Adventures in Talomir (WHAT) by Two Hour Wargames that is going to be released soon. This is a special situation in which the Star, the miniature representing the player, turns into a Werewolf (think of an American Werewolf in London).
So during the adventure you are trying to find out a way to get rid of the curse of being a Werewolf by fighting against Witches, Trolls, Giants, Vampires and Wizards, but you may suffer from several Full Moons during the campaign in which you stops being a human being and turns into a Werewolf; which is no good as you can get killed or worse, you can kill innocent people! (you lose advantage Rep d6 for each innocent slaughtered).
I played the Encounter on a 90x90 cm. mat and the game took me less than 15 minutes to finish it. Sweet and easy.
The table setup is in the outskirts of Wolfstone, North of Mirdholme, Talomir. The three yellow dots are the PEFs generated as per the rules.
Your character:
"There
is Full Moon tonight and as soon as a moonbeam touches you, your
blood starts to boil from within, burning and hurting beyond measure
as your body insanely convulses. After a quiet moment you open your
eyes into a new life form. You look up to the Moon and from your
chest comes out a deep and terrifying howling that shreds your throat
and your soul alike. You have turned into a blood thirsty beast!"
The beast moves towards one of the PEFs (Possible Enemy Figures) in the centre of the table; there is contact and it is resolved as a Female Labourer. She cannot see the monster in the dark but it can sees her! Luckily for her, the Werewolf restrains himself and disappears into the night (I rolled in a chart for that).
Turn 2. Townsfolk 4 - Werewolf 3.
PEFs activate first but none move. After that I could leave the Encounter as I only have to resolve one PEF to be successful, but as I am testing the scenario I decide to check another PEF.
The Werewolf moves to its right and again there is a contact (the Enemy Rating or possibility of meeting somebody is 3 in this place), and I can run into Townsfolk, Wild Animals or even my own Followers, my band. I meet with another Townsfolk, this time it is a Hunter.
On this occasion the Character fails to restrain himself, loses control and charges the Hunter, Roar!
There is melee. None of them wears armour. The Hunter has a hand weapon and the Werewolf its claws and teeth but also the attribute Rage. The beast wins the first round of combat but it only scratches the Hunter. I roll for another round and again the Werewolf wins, causing the Hunter a fatal wound. Then, in the next turn it leaves the table and the Encounter is over.
So our character escaped alive from this Encounter and although he lost 1d6 Rep for killing the Hunter, at least he didn't come across his own men. Next Full Moon, after a few scenarios in between, would be harder for him to restrain from murdering!
Today we finally played a long promised game to my 8 years old son. He had finished painting his second miniature, a plastic Dwarf f from the Skull Pass, and wanted to test it on the battlefield.
He also wanted to kill some Orcs, so I grabbed another Dwarf and quickly set up a game of WHAA from THW which is perfect to introduce somebody to wargaming as it can be played cooperatively.
Esta mañana finalmente jugué con mi hijo de 8 años una partida que le tenía prometida desde hacía tiempo. Acababa de terminar su segunda mini, un enano de la caja del Paso de la Calavera, y quería probarlo. También quería matar unos cuantos Orcos así que me pillé un enano y rápidamente preparé una partida de WHAA de THW que es perfecto para introducir a alguien en el mundo del wargame ya que se puede jugar cooperativamente.
He soon mastered the ruler.
Enseguida le cogió el truco a la cinta métrica.
So we were two Dwarfs, me Rep 5, AC 5, 2H Axe, 2 throwing axes, and my Son's Rep 4, AC 5 + shield, axe and two throwing axes, who were walking by the road to a village which had been raided by some evil Orcs.
Así que eramos dos enanos que iban por la carretera camino de un aldea atacada por los orcos.
The solitaire Dwarf at the bottom is my son's
El enano solitario al fondo es el de mi hijo
It was his first game and in the beginning he was a bit shy and afraid of being killed so I stepped forward and killed the first two Orcs. He participated in the melee against the third one but I killed it as well. In that moment he was a bit frustrated and wanted to resolve immediately the last PEF (Possible Enemy Force counter) to kill something!
Este era su primera partida y tenía miedo de que lo mataran asi que fui delante y maté a los dos primeros orcos. Luego me ayudó contra el tercero aunque también lo maté yo. Aquí ya estaba el pobre un poco frustrado y deseando matar algo.
Helping daddy to kill the baddies
Ayudando a papi a matar a los malos
The last PEF resulted to be three Orcs to my son disappointment as he wanted to fight against one of the river Trolls I have. The three Orcs charged and I killed one with a throwing axe and another in melee. My son failed his throwing axe but could slain the Orc in hand to hand combat. His first blood!
That was also the end of the game.
La última PFE se transformó en tres orcos y mi hijo se quedó un poco decepcionado porque no salió ningún troll de los que tengo en la vitrina. Los tres orcos cargaron y yo maté a uno lanzandole una de las hachas arrojadizas y a otro más en melé. Mi hijo lanzó otra hacha pero falló, aunque luego mató al orco en combate cuerpo a cuerpo. ¡Su primera sangre!
Esto también fue el fin de la partida.
Final showdown
Straight afterwards I grabbed one Troll and pitched against our two Dwarfs to show my son how dangerous can be such a beast. We both charged the Troll who counter charged us and killed my son with one telling blow. Then the Troll charged at me and kill me outright as well. After that my son thought we were lucky for not meeting with one Troll on the game, although now he is pestering me to buy some more Trolls for him :)
Justo después cogí un troll y lo enfrenté contra nuestros dos enanos para enseñarle a mi hijo lo peligroso que podía ser un troll. Lo atacamos pero nos interrumpió y mató de un poderoso golpe a mi hijo; luego me cargó a mí y me machacó de otro golpe. Después de esto mi hijo me dijo que menos mal que no nos encontramos con ningún troll durante la partida, aunque ahora anda dandome la lata con que le compre unos trolls :)
Warrior Heroes Armies and Adventures is a ruleset for skirmishes, but it also contains some rules in case you want to play a big battle ala Warhammer Fantasy Battles or Armies of Arcana. So today I decided to try those rules for the first time, and then I gathered all my 10 mm minis and quickly arrayed them for battle.I made four units for each side and deployed them randomly.
Orc deployment from left to right: one unit of orc warriors Rep 4 AC 2, another unit or Orc warriors with a standard, one unit of Black Orcs with two Trolls in it, and one unit of Orc archers in the wood. Altengard deployment from left to right: one unit of arquebusiers Rep 4 AC 4, one unit of infantry Rep 4 AC 5, one unit of allied Mirholme warriors Rep 4 AC 5, and finally one unit with four knights Rep 5 AC 6.
The battlefield with the Orcs on the right and men on the left.
On the first turn only Altengard activates and moves forward all its units. On the next turn only the Orcs move and the first unit are the archers who advance and then charge instead of firing as they all are frenzy. The arquebusiers shoot them and one Orc dies and two retreat but the rest charges, killing more than half of the unit in one go, and exterminating it in the following turn. Then the unit of Black Orcs charges the Altengard infantry, killing most of them as well. The Mirholmen is the only unit which holds heroically against the Orcs, treating them on equal terms. The last unit of Orcs tries to charge the knights but in the last moment stops and the charge is failed. In the last turn the knights are finally charged, being killed two of them and the other two routed. The rest of the Altengard army dies except the warriors from Mirholme, but I finished the battle here as they were outnumbered by four to one and its situation was hopeless.
Four were the main causes of the Altengard's defeat: first they did not have any standards and consequently most of the soldiers routed instead of only retreating. Secondly, excepting the Mirholmen, all the human units were outnumbered. Third, The Humans had bad luck rolling for activation and could only stand and see what was happening, whereas the knight being capable of activating a couple of times due to their Rep, failed all his charges and stood still watching the Orcs coming at them. The fourth reason was that all the Orcs were Frenzy and this give them the extra edge they needed to win all the melees.
WHAA Big Battles works perfectly to simulate WHF style battles; melee is deadly and the game is fast. I think I am going to use WHAA BB as a bridge between WHAA skirmishes and Rally Round the King for mass battles, for my Campaign of Einar.
I finally played the last chapter of this short campaign where King F'yar seeks his revenge. If this is the first time you heard about this, then I suggest you to read before the three previous parts below, belonging to this campaign called Blood Bath at Orc's Drift.
"The Army of the Grand League has been called east to the region around Ortar, where a great host of goblin tribes are at war with the inhabitants. Crossing the river Canis some two days ago, the Grand League General has left his rear at small supply base. The defenders of this outpost are a unit of Elves led by Brommedir and a unit of Dwarfs under the command of Osrim Chardz....Unknown to the generals of the Grand League, the actions away to the east are not only threat to the province of Ramalia. Due to the frailty of their oversight, Orc's Drift is the last manned post standing between King F'yar's onslaught from the north and the capital city of Palesandre."
Start of the game Brommedir's Bows and the Engineers of the Osrim Chardz may begin play anywhere within the perimeter wall of the outpost. Brommedir is an Elf Rep 6 in full plate armour AC 6, Movement 6 and Hardiness 3; he is armed with a long bow and a sword and his archers are Rep 5, AC4, Movement 6, and armed with long bows as well. Osrim Chardz is a Dwarf Rep 5, AC 4, Movement 6, Hardiness 3, and armed with a 2HW; his Dwarfs are Rep 5, AC 4, Movement 6 and armed with assorted hand weapons. I had prepared the stats and figures from the Druid Snart Ferndale and his patients at the hospital, the top central building, but in the last moment I decided to quit them from the game as they didn't add anything to it.
The Orcs come from four different points. Coming from the top and through the river Canis, Magyar Ironfist and the Kwae Karr Orcs. Magyar is Rep 5 and the boyz Rep 4 AC 2 Movement 8, Frenzy, being the other Orc tribes exactly equal. From the left it is coming Hagar Sheol with the tribe of the Severed Hand Orcs. From the left bottom what it left from the Vile Rune Orcs from Kachas Pass, with Fangorn Gripe and the already wounded giant Guthrum Mane. Finally, from the bottom King F'yar himself on his Wyvern and accompanying him his bodyguard, 5 Black Moon Orcs. King F'yar is Rep 6, AC 5, Hardiness 3 and armed with lance and sword. The Wyvern is Rep 5, AC 8, Movement 16, Hardiness 4, Fly, Terror and Vicious. His bodyguard are all Rep 5, AC 4, Movement 6, Hardiness 3, Frenzy.
Victory conditions This is a fight to the death! May the best man win!
Notes before the game As I didn't have so many single miniatures to represent all the Orcs, I had to resort to my Warmaster Orc bases. Each base contains 10 miniatures and it is what it represents. Later in the game I was exchanging them for single bases as the Orcs was suffering casualties.
I used the skirmish WHAA rules for everything except for shooting. The shooting rules for Massed Battles worked perfectly with the skirmish rules and speed up the game significantly.
As usual click on pictures if you wish to watch them bigger.
Start of the game
Turn 1. Orcs 5 - Grand League 3. All the Orcs move as fast as they can towards the outpost. King F'yar's bodyguards pass through the forest and at the sight of the enemy they instantly charge against the barricade which resists without incidents. On the left, as Guthrum Mane gets closer, the Elves release a volley of arrows that wound the giant two consecutive times, leaving it with Hardiness 1 and blinking incredously at the many feathered sticks popping out from its body. The rest of the Vile Rune Orcs advance sheltering behing the giant.
Turn 1
From the top, the Kwae Karr Orcs run down the road and exchange arrows with the Elves behind the fence, resulting in two Orcs killed, two falling back and one routed.Although eager to reach his revenge, King F'yar holds his Wyvern for the moment.
In their turn the Elves concentrate their shooting on the giant and finally kill it. Poor Guthrum couldn't stand any longer after its severe wounds at Kachas Pass.
Turn 2. Orcs 6 - Grand League 5. King F'yar decides it is the moment, and spotting Osrim Chardz at the fence, he charges him, killing instantly and riding through him and against two more Dwarfs that also fall slained. He came in style and the surviving Dwarfs run away in front of him like never before!
King F'yar's wild ride
Now the surviving Dwarfs regroup and charge back F'yar on his Wyvern but nothing happens. The rest of the Dwarfs desperately fight off the Black Orcs at the fence.The Elves shoot at the Kwae Karr and the Severed Hand, killing one Orc from each tribe.
Fangorn Gripe and his Orcs charge the Elves but he is the only one to reach the fence as the rest of his lads are killed by the Elves' arrows during the charge! At the bottom of the outpost the Black Orcs start to turn the tide killing two more defending Dwarfs and jumping over the fence. King F'yar slains all four Dwarfs locked with him in melee.The 26 Kwae Karr Orcs successfully charge the Elves but instead of waiting for the charge, Brommedir and his men leave the defensive position and counter charge them! This is so unexpected that all the Kwae Karr Orcs rout in panic and leave the battlefield. Homeric! Also, the Severed Hand Orcs halt in place and don't react unable to cope with the situation.
The Elves heroically charging the Orcs, or are they going away from the Wyvern?
Turn 3. Orcs 1 - Grand Legue 6. Brommedir's Elves clean off the centre of the battlefield by shooting down three remaining Orc archers from the Kwae Karr tribe near the bridge, and killing three more in melee, but losing one Elf in the action.
The Black Orcs finish the last Dwarfs in the outpost while King F'yar locks in melee with two Elves.
Mopping upthe outpost
The Severed Hand finally react and charge Brommedir's Bows.
"Get 'em ladz!"
Turn 4. Orcs 2 - Grand League 4. Brommedir's Bows kill three Orcs and force four more to retreat. Showing their higher quality, they start to put pressure on the Orc rabble.
The straggled Elves at the outpost are put to an end and some more Orcs and Elves die in the melee with Brommedir.
Brommedir in trouble
King F'yar sees his opportunity and heads for Brommedir but the several thousand kilogrames of a green flying and screaming monster proved too much for those already beaten Elves, and to much Brommedir's dismay they all drop their weapons and rout from the battle!
Victory!
Conclusion The battle was quick and ferocious and the Grand League had still chances to win until the Elves routed from the Wyvern. After so many years of waiting, King F'yar finally obtained his revenge.
With this game I close a project that started in the eighties when I bought this marvellous campaign set from GW. I never played it until now because I didn't like WHB rules then, and because I couldn't get an appropriate ruleset to play it. Eventually it appeared Warrior Heroes Armies & Adventures from Two Hour Games and it has been a great pleasure to recreate this campaign with that system. I'd like to say that I'm very happy of finally playing all the campaign up to its conclusion.
The game lasted about three hours incluiding taking notes and pictures. I hope you have enjoyed all these four AARs and expect to meet you in my next WHAA campaign in this blog.
“Linden way is a small frontier settlement and trading post. At present, an emergency guard of citizens from the southern township of Meledir are tasked with the duty of guarding the settlement. The militia are covering for the usual guard of professional soldiery, who have been called south to defend the region around Ortar against the assault of the Goblin hordes. The dilemma facing the militia at the start of play, is that their homes and families in Meledir are undefended. They are the only defence standing between any incursion from the north and their homeland. At the start of play, the civilians of Linden Way still occupy the settlement. When enemy forces appear they will attempt to leave the post southwards and warn the people of Meledir whilst the militia try to buy time for their evacuation.”
Mayor Leofwine is the captain of the Militia and he is a Rep 5, Hardiness 4, AC 4 and armed with a two handed broadsword.
The Militia consists in five long bowmen Rep 4 AC 2 and 20 men Rep 3 AC 2 and armed with improvised weapons.
There are also ten civilians Rep 3 AC 2 with improvised weapons.
“The Linden Way militia begins play within the barracks. Five of them are posted in the watchtower. The settlers begin play within their own respective buildings and must attempt to leave the settlement by the southern road.”
“King F’yar’s own tribe, the Kwae Karr Orcs, has been ordered south down Linden Way for the rendezvous at Orc’s Drift.”
Magyar Ironfist is the chieftain of the tribe and he is a Star Rep 5, Hardiness 1, AC 4 and armed with a two handed mace.
Bagrash is the shaman of the tribe and he is a Rep 5, AC 2.
The Kwae Karr Orcs are 10 archers Rep 4 AC2 and 30 warriors Rep 4 AC 3 with hand weapon and shield.
Special rules
“Old Barrachus is an insane illusionist who lives in the ruined cottage which he believes is a beatiful palace. Old Barrachus suffers from chronic schizophrenia. His multiple personality disorder is reflected by a throw of a 1D6 every time he senses magic being used or Orcs near the ruined cottage.
1 suffers from stupidity (do nothing)
2 suffers from frenzy (goes frenzy and charges)
3 suffers from panic (routs)
4 suffers from terror (retreats)
5 suffers from fear (retreats)
6 suffers from hatred (casts a spell)
The scenario and the whole campaign is being played with the rules Warrior Heroes Armies & Adventurers from Two Hour Wargames. Previous scenarios can be found scrolling down the page. Also, do not forget to click on the images to enlarge.
Turn 1
Militia and civilians run out from all the houses except one. The Orcs run faster by the road.
Turn 2
The Orcs activate first and keep running, they win the test of wills but are unable to charge into melee for a couple of centimetres.
Two archers from the militia shoot at point blank but miss and in return are charged and killed, two men retreat and two more rout. This is a bad start for the militia and a sign of what is to come.
The rest of the militia men in range charge the Orcs butthey fail to do any harm and two more die. Knowing that killing the Orc chieftain is the only way to win the day, Mayor Leofwine charges Magyar Ironfist who responses with a killing blow, but fortunately Leofwine resists it as he passes his Hardiness test.
The three last archers near the ruined cottage shoot at the orcs and kill one and force another one to retreat.
So far the situation is holded but for how long?
Turn 3
Bad luck for the militia as they do not activate this turn.
Orc archers spread on the hill and dominates the south road to Meledir. From there they start shooting to the fugitives, but the ten archers miss!
Rampaging Orcs charge all the line and six men die in the first clash, three rout terrorized by the sight of their fallen comrades and three more fall back. They are no match for the brave Kwae Karr Orcs! Some Orcs jump the fence and start to push back the militia.
Bagrash stands in the hill near the ruined cottage and casts the spell “Steel wind” but fails it and loses 1D6 from his Rep for future spell castings. The mad hermit at the ruins senses the use of magic but a veil of stupidity falls upon him and does not react.
Turn 4
Disgrace for the defenders!! The militia fails again to activate, possibly due to their lack of military experience makes them unable to cope with the situation.
The Orc archers shoot again and this time kills two fugitives down the road and make six of them fall back to the houses.
The Orcs at the village charge again sensing victory is at hand and kill three men, forcing other three to retreat and two more to rout. Mayor Leofwine is completely surrounded by Orcs and he is hit again but yet again he resists the blows as he passes his Hardiness test.
More Orcs pass the fence into the village.
Bagrash tries again “Steel wind” and again miserably fails it, loosing another D6 for future spells. The mad hermit senses again the powers of magic working near him and panics, routing from the battlefield!
Turn 5
Finally the Militia can activate, but after the Orcs.
The Orc archers in the hill kills two more fugitives and make the rest to retreat, but when doing so they face Orcs chasing them and four of them decide to charge them. Unfortunately, they fail to kill none of the greeny beasts and have to retreat again when they witness how one of them eats Orc steel.
The three remaining long bowmen and one militia die in the melee at the entrance of the village. Magyar and four of his lads attack Mayor Leofwine who still resists.
Bagrash does not give up and tries again the spell “Steel wind” and guess what, he fails it again, and this time with style. He suffers from backlash and dies consumed by uncontrolled mystic energy. So many years studying arcane lore for that, can you believe it?
The fugitives gather some valour and two of them charge an isolated orc, managing to stun him, but maybe scared by this unexpected outcome, they fail to kill him. The rest of the civilians tries to flee by the south road.
Turn 6
Leofwine attacks but loses again and this time he results wounded; he is now Hardiness 2. The rest are Rep 3 and cannot activate.
Orc archers kill two more fugitives, making another two retreat.
In the village, Magyar and his Orcs attack again Leofwine who is now wounded, but he revolves fiercely and slays down one of them and pushes back two more. He is a lion among wolves!
Two more fugitives are mow down by the chasing Orcs.
Turn 7
The surviving fugitives must flee through the road and the orcs are there waiting for them. Leofwine manages to kill another Orc and another one routs.
Magyar goes really mad seeing how this damned human refuses to die and keeps him away from his glorious victory. He charges again and strikes a fatal blow on Leofwine who cannot resist it as he fails his Hardiness test. Mayor Leofwine is finally dead with all his men as the last two surviving civilians are hunted down.
Conclusion
The Militia could not use their longbows from the distance to soften up the Orcs before the clash as they reach the outpost really fast and then activated alone for two consecutive turns, which allowed them to easily overwhelm the helpless defenders.
Mayor Leofwine and the Militia sacrified themselves for nothing as nobody managed to escape to give the alarm. It has been a total slaughther for the Militia and a major victory for the Orcs who has only lost four warriors and the useless shaman.
This was the first scenario where Magic was used but it was very disappointing as the mad hermit fled the battlefield without doing anything at all and the shaman Bagrash exploded with one of his spells.
For the last battle of this campaign I have to paint some more terrain and characters plus king F'yar on his wyvern. Besides, I'm now starting a new project, an Early Imperial Rome army for DBA with Pendraken 10 mm figures, so I'm afraid this last battle will be delayed a little bit more.
“Ashak Rise is inhabited by a small group of Dwarf gold prospectors, renegades from the Dwarf army of the Grand League of Ramalia. They have been absent without leave from the army for some time now but have so far managed to keep their lucky strike a secret from the few travelers that pass along the road. Cautious in their greed, they maintain a constant watch at either end of the road that passes through the center of the rise, while the remainder of the force pan for gold at the river’s edge.At the beginning of play the Dwarfs store of gold is hidden under the floor boards of the cabin, and they will fight to the death to keep it.”
Borinn Fimbul is a dwarf chieftain Rep 5, AC 6, Hardiness 4, armed with a two handed axe. He could be deployed anywhere but I decided to put him in the cabin log guarding the gold. Snorinn Fimbul son of Borinn is Rep 4, AC 4, armed with sword and hand crossbow.The Dwarf clansmen are 11 warriors Rep 4, AC, 4 armed with hand weapons and hand crossbows, except four of them equipped with crossbows.Dwarfs objective is take the gold and run.
“At the orders of king F’yar, the Orcs and hounds of the Severed Hand are moving down from the Northland Wastes along the only available passes to meet the main army group at Orc’s Drift where the king is mustering his attack against the Grand League of Ramalia. Scouts have reported seeing smoke of a camp fire above the plateau and the Severed Hand commander prepares to flush out the inhabitants before proceeding down the mountain and on to Orc’s Drift.”
Hagar Sheol is the chieftain of the Severed Hand Orcs and has heard that the Dwarfs have a huge amount of gold hidden somewhere in the area. Hagar is a Star Rep 5, Hardiness 1, AC4, and armed with axe and shield.Grashak Kra is the Houbhound Handler Rep 4, AC 2 and armed with a mace and bringing with him 10 ferocious hobhounds (war dogs).The Severed Hand Orcs are 20 warriors Rep 4, AC 2 with hand weapon and shield, plus 10 archers Rep 4, AC 2.
“Ashak Rise is a plateau couched in the mountain of the Northland Wastes. It is surrounded on all sides by sheer, impassable cliffs and is totally isolated. The only way in or out of the plateau is via the road to Kachas Pass and Kachas trail to the North West or the road to Linden Way to the East. Flowing from the North is the River Canis which can only be crossed by a stone bridge. The small log cabin stands roughly at the center of the rise atop a slight hill.”
Special rules None of the Dwarfs are allowed to leave the table without their gold due to their effects of gold fever. There are six very large and heavy bags of gold and one creature can carry one at a time; the mules can carry up to two. The mules are stubborn and will refuse to move for a turn on a roll of 1 or 2 with a D6.
The orcs arrive and the Dwarf sentinel raises the alarm and runs towards the bridge. Now roll for activation normally.
Turn 1 Grashak Kra’s war dogs are within reach charge but halt in their place when they get close to the Dwarfs. The three Dwarfs down the bridge shoot with their crossbows and kill one, make fall back another one and force to charge to the third one who is killed in the melee. Then the same happens with the Orc warband; The Dwarfs shoot again and the first Orc dies. It seems that those few Dwarfs are enough to intimidate the whole Orc tribe!The ten Orc archers shoot to the group of Dwarfs behind the river and kill one of them.
The Dwarfs down the bridge shoot again and one orc falls down and the other charges. In the melee a Dwarf wins and pushes four consecutive times an Orc until he kills him. The Dwarfs at the other side of the bridge run to the bridge and to the cabin log to try to stop the Orcs at the bridge and run with the gold. One Dwarf and one Orc die crossing arrows over the river. Borin starts to quickly load the gold bags on the mules but they are too heavy and can only do it one by one.
Turn 2 Orcs are confused for the quick response of the Dwarfs and their first casualties and do not move. Hagar tries furiously to make his boys charge but without any effect.
The Dwarfs regroup and close ranks at the bridge. Some of them shoot their crossbows but no one hit a thing. Borinn and another Dwarf load two more bags of gold on the mules.
Turn 3 Much to Hagar desperation, Orcs are still deciding what to do.Meanwhile the Dwarfs load two more bags of gold and finish taking defensive positions.
Turn 4 Hagar tells his boys about the Dwarf gold and they finally charge. The boys are too far to reach the Dwarfs at the bridge but not the war dogs. Luckily for the Dwarfs the bridge is so narrow that only three of them can fight at the same time. In the melee one war dog is slain.The archers kill the crossbowman Dwarf that had taken cover in the wood.
The Dwarfs kill another war dog and pick up the last bag of gold.
Turn 5 A brief pause in the fight and Orcs and Dwarfs in the bridge curse and spit at each other.
Turn 6 The aggressiveness of the Orcs overwhelms the Dwarfs who freeze in their places. Orcs charge in the bridge but Dwarfs momentarily resist and kill one Orc and one war dog. The third war dog first pushes a Dwarf and then kills it, breaching the Dwarf defensive line at the bridge.The arrer boys kill another Dwarf beyond the river.
Turn 7 The Dwarfs kill two more war dogs at the bridge.The Orc archers kill another crossbowman Dwarf but at the price of loosing two of them in the exchange.At the bridge Hagar Sheol charges with his boys killing the two remaining Dwarfs and freeing the way to the cabin log and to the gold.Snorinn has heroically fallen defending the bridge and he will be remembered in the book of the heroes. His father Borinn is sad but he comforts himself caressing the gold nuggets.
Turn 8 The last defender of the bridge dies at the hands of the Orc mob.
Turn 9 Orcs and war dogs run towards the cabin log but they stop again when get close the Dwarfs.The Dwarfs are leaving with the gold but one of the mules stubbornly refuses to move.
Turn 10 To the dismay of Hagar and Grashak the Orcs stop again to decide what to do. Looks like these "bright" guys once lose the initiative, do not know what to do next.
The Dwarfs and the mules keep running in a very "undwarfish" manner.
Turn 11 The rest of the war dogs move toward the last defending Dwarf but halt again; maybe because of the foul smell of the Dwarfs? The rest of the Orcs run by the road chasing the running Dwarfs and the gold.
The isolated Dwarf knows he is not going to make it and decides to die heroically. He then charges the two last war dogs and kills one of them.The running Dwarfs cannot make the mules move, possibly because of their heavy load.
Turn 12 The war dog charges the Dwarf but nothing is decided. The rest of the Orcs run after the gold but again they stop on their heels when they see the Dwarfs so close.
The Dwarfs still won’t move. Their greediness will be their doom.
Turn 13 The doomed Dwarf kills another war dog and the first mule leaves the board and safely disappears into the landscape.
Turn 14 The Orc archers rush forward, shoot and manage to kill the last mule! The remaining war dog charges the Dwarf but cannot kill him.
Borinn Fimbul looks at the dead mule and then at the Orcs coming at him and with a grief, bigger than when his son died, finally decides to pick up one of the gold bags and run for his life, leaving the last bag with gold for those bloody green skins, Grimmir curses them!The heroic Dwarf charges the last war dog and kills it! A pity there is nobody to witness his heroic deed and write a saga about him.
Turn 15 Hagar Sheol picks up the abandoned gold while looking in anger to those coward Dwarfs disappearing in the horizon. Well, as certain as he has accomplished his task of leaving no one alive in Ashak Rise, that he won’t either share this gold with nobody. Having thought that, he snarls an ugly smile and turning back to his boys he breaks laughing at what he is seeing: The rest of his boys are releasing their frustration on the surviving Dwarf. Pulp the stuntie! Graaaar!
Conclusion The Dwarfs did the only thing they could possibly do and run with the money. The Orcs had a horrible luck and lose all their Test of Wills; which made me think about twisting it a little bit for the next time as I didn’t see it very realistic.
As it seems that numerical superiority gives confidence I thought about giving a +1D6 in the Test of Wills to the troops who doubles numerically his opponent, and +2D6 if triple them, and so on and so for. Thus, the Orcs wouldn’t have failed all their Tests of Wills against so few Dwarfes.
The Severed Hand Orcs lost 5 warriors, 3 archers and all the war dogs. The Dwarfs escaped with almost all the money, but Hagar in not going to tell that to F’yar.
Well, next battle will be Linden Way but as usual, first I need to paint about 30 militia men and some more terrain.
BBAOD is a supplement published in 1.985 for the second edition of Warhammer Fantasy Battles and designed by Ian Page, Joe Dever and Gary Chalk. As I never liked WFB rules, I never got to play this mini campaign; but now I finally have found a system that I like and that also it allows me to play alone. This new system is Warrior Heroes Armies and Adventurers, of the American house Two Hour Wargames.
INTRODUCTION
After his last defeat in the winter campaign of the Kol hills five years ago, the orc king F'yar and his wyvern have returned to take revenge. By fatally poisoning the leader of the Alliance of elves, dwarves and men who defeated him in the past, F'yar manages to disorganize the armies of the Alliance and retake his leadership at the front of the orcs of his tribe, the Kwae Karr.
Now, in the deserts of the north, F'yar is named warlord of all the tribes and decides, together with the king of the goblins, to launch a major attack. Goblins will attack the lands of the east, attracting the army of the Great Alliance, while king F'yar and his hordes of orcs will charge frontally the capital of the kingdom of Ramalia, Palesandre.
And thus the campaign begins. The orc tribes have been summoned by king F'yar to meet in Orc's drift and from there to advance towards Palesandre. On their way to the meeting point, they must raze all the settlements they may find and not leave anything alive behind. These settlements are three: Kachas pass, Ashak rise and Linden way.
Kachas is a narrow pass that ends at the plains of Fendal. The pass has a small outpost kept by elves from the Fendal forest, who are watching the passage from any intruder. The tribe of the orcs of the Vile Rune has orders of king F'yar to destroy this post and meet the main army at Orc's drift on the following day .
The outpost is kept by 15 elves of Rep 5 and armed with long bow; plus its leader, Erdolas Thringal, Rep 5, Hardiness 3 and armed with long bow and sword. The Vile Rune orcs are forty Rep 4 armed with hand weapons and shields; their leader Fangorn Gripe, a Rep 5, star, hardiness 3 and armed with shield and sword. Also there is Guthrum Mane, a mountain giant of Rep 7, Hardiness 5 and armor 6.
Obviously, the elves do not have many possibilities of winning, but the important thing here is how many orcs they can take with them, because the orcs that die here will not participate in the great battle at Orc's Drift, where the destiny of Palesandre will be decided.
Turn 1
The Vile Rune orcs exit the ravine and are inmediately sighted by a wood elf on duty. The alarm is raised.
Turn 2
The first big wave of orcs headed by their captain, Fangorn Gripe runs towards the outpost while behind them, the second big wave
with the giant Guthrum Mane begins to leave the pass.
The elves quickly deploy behind the fence, windows and doors of the barracks. Thirteen elves shoot and the first orcs fall down.
Turn 3
After the first rain of arrows, Fangorn Gripe decides it is enough and leads his orcs as fast as possible to the small wood to his right. Meanwhile the rest of the tribe advances directly towards the outpost, tightening itself behind the giant to avoid being shot by elves’ arrows. This time they shoot in mass towards the towering mountain of meat approaching to them; Guthrum Mane is then severely wounded and he pauses momentarily to recover.
Turn 4
All the elves shoot again against the giant with the hope to kill him once and for all, but without success. The first group of orcs finishes crossing the wood and pause at the edge and in front of some elves from the outpost. The orcs in the centre continue running like possessed people towards the objective, while the giant absorbs all the enemy fire.
Turn 5
Orcs move first and the ones in the wood leaded by Fangorn Gripe charge the elves. After one round of fierce fight two elves and four orcs are killed but nobody abandons the position. The orcs at the centre advances again and two of them manage to charge but one is shot down and then the other one stops the charge and falls back. Another one cannot resist it and flees from the battle.
Now the elves fire at the big group of orcs that are about to assault the fence. The orcs suffer several losses, five of them fall back and three more break off the battle.
Turn 6
Unfortunately for the orcs, elves activate first and loose a cloud of arrows at point blank range and with more penetrating power; two more orcs bite the dust, one more flees and another one falls back; the frontal attack is contained so far. Three elves shoot the giant but they do nothing. On the left flank they also shoot and but only to leave the captain of the orcs momentarily stunned.
The surviving orcs finally charge. It is payback time! The giant squash two elves in a single blow and crosses the fence into the outpost.
Turn 7
Elves activates first again but they are now just a few. They fire again at the captain of the orcs and at the giant, but without luck. Another orc is killed and some of them fall back but that is all.
The orcs keep methodically slaughthering the elves and two more die. The remaining ones hold the green tide heroically for one more turn, but without hope.
Turn 8
Activation is a draw. A momentary pause between the combatants takes place.
Turn 9
This time the elves, surely disheartened, do not activate. Its the time of the orc. The giant crushes another elf, and another one dies more at the hands of the green boys.
Turn 10
There are only three elves now, completely surrounded and outnumbered. They do their best but it is the end.
Conclusion
As expected, the orcs won the day but at a dearly cost. The elves killed 25 orcs and force six of them to flee. When more orcs fell was right before the clash, where the great penetrating power of the long bow at short range was noticed.
Regarding Guthrum Mane and the rest of the orcs, on the following day they will head for Orc's Drift, but tonight there will be a great feast with elf meat!
The next encounter is the Kwae Karr orcs and the hobhounds of Grashak Kha raiding a dwarf mining camp at Ashak Rise, but first I must paint those poor dwarves ; -)



.JPG)


